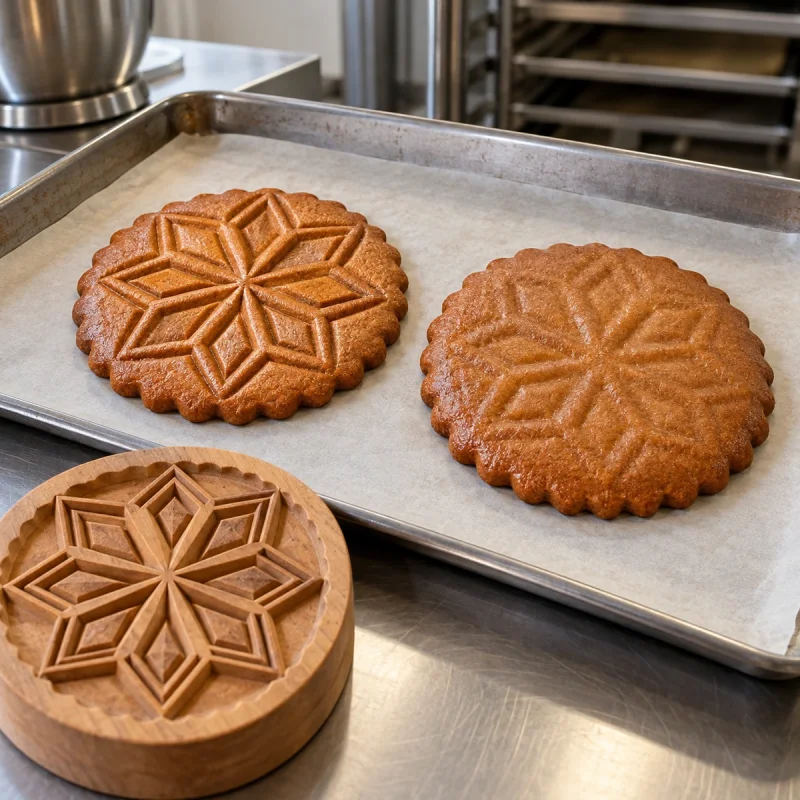
A gingerbread cookie can come out of a wooden mould with a beautifully defined pattern, only for the smallest lines to disappear during baking. That doesn't necessarily mean the mould is faulty. As the dough heats up, it may spread, rise or change shape at the surface. Don't start by adding more flour: work out when the definition was lost. That tells you whether to adjust the stamping technique, the condition of the dough or the baking process.
Check the impression before the cookies go into the oven
Look at a freshly released cookie under light coming from the side. Can you see the fine lines and corners of the design? Is the outline still even, or did the dough pull part of the pattern away as it left the mould? If the details are blurred before baking, a hotter oven or a longer bake will not put them back.
A clean impression has visible grooves and releases without tearing. If dough remains in the carved recesses, check that the mould is clean and dry, that the dough is firm enough to handle and that you are pressing evenly. Don't try to rescue an already distorted cookie by stamping it harder. Make a fresh test piece instead.
Soft gingerbread and embossed biscuits have different goals
Traditional soft gingerbread is often designed to rise a little and stay tender. Fine embossed lines need something else: the dough must change shape as little as possible. These are different baking goals. A method that improves softness may also reduce the sharpness of a stamped design. Not every recipe for light, soft gingerbread will preserve intricate details from a wooden mould.
If the decoration matters most, choose a recipe specifically designed for stamped cookies that spread very little. If a particularly soft centre matters more, expect a less sharply defined pattern. Nor should you replace honey-based dough with a completely different formula without testing it. Honey, sugar, fat, flour and any raising agents affect the way each recipe behaves.
What makes a raised pattern lose definition during baking?
Fat softens as it warms, sugar and dissolved ingredients influence how the dough flows, and the structure provided by flour takes time to set. If the surface spreads before it becomes stable, the raised edges of the design become wider and flatter. Spreading is a strong possibility when the cookie's entire outline grows noticeably as well as its pattern fading.
Rising is a separate mechanism. Baking powder, bicarbonate of soda and other raising agents can produce gas that lifts the dough and alters delicate lines. An incorrect or excessive amount can therefore blur the pattern, but don't remove the raising agent from a recipe without thinking it through. First establish whether that particular recipe is actually intended for embossing and what texture it is meant to produce.
Some cookies puff up in the oven, then reveal more of their pattern as they cool. Don't judge the finished result solely through the oven door. Compare cookies of the same size and thickness, and look closely once they are completely cool. Surface colour alone won't tell you how much detail has survived.
Using a wooden mould without damaging the design
Check the mould before you start: no old dough should be lodged in its grooves. Begin with a clean, dry wooden mould and dough that can hold an impression. If needed, dust the surface very lightly with flour and brush away the excess with a dry pastry brush. A thick layer of flour can fill fine recesses, so it is not a solution for dough that is much too sticky.
Press evenly so the dough reaches the shallower parts of the carving as well as the deeper ones. Make sure the piece is supported and that the mould rests securely on the work surface. Release the cookie gently rather than dragging it across the pattern. If you can only get it out by force, adjust the dough and try again before filling a whole baking tray.
A carved wooden mould is not bakeware: never put it in the oven. Follow the manufacturer's cleaning instructions, and avoid dishwashers and prolonged soaking. Damp wood or bits of dough left behind can affect how the next cookie releases, which is why careful cleaning matters to a consistent result.
Dough temperature: the balance between sticking and cracking
Butter-rich dough that becomes too warm may soften and stretch in the mould. Chilling can help reduce sticking and later spreading when it suits that recipe. But very cold or stiff dough may crack under pressure and fail to reach tiny details. The aim is not the lowest possible temperature. It is a consistency that releases cleanly and holds its shape.
Before changing the ingredient ratios, compare two cookies made from the same batch. Shape one as usual and the other after moderate chilling, provided the recipe allows it. Bake them under the same conditions and compare their edges once cool. That gives you useful evidence about chilling without simultaneously adding flour or changing the raising agent.
The oven cannot compensate for the wrong dough
Preheat the oven according to a tested recipe, then bake comparison pieces on the same tray and in similar positions. If one cookie spreads and the other doesn't, also check thickness, size and how long each sat on a warm worktop. Changing too many conditions makes the result difficult to interpret.
A higher oven temperature can set the surface more quickly in some doughs, but it can also brown the edges before the middle is properly baked. There is no single oven setting or baking time that works for every gingerbread and embossed biscuit. A crisp-looking imprint is no excuse for an underbaked cookie: check doneness and texture against the recipe you're actually using.
A six-step test to pinpoint the cause
Start with at least two cookies made from the same dough, with the same design, size and thickness. Record what the pattern looks like immediately after stamping and again after the cookies have cooled fully. This is a practical comparison of one change in your kitchen, not proof of a universal recipe.
- Establish a baseline. Make two pieces from the same batch, keeping the design and thickness identical. Note the recipe, mould and handling conditions rather than relying on memory later.
- Inspect the unbaked impressions. Look at both cookies under the same light. If fine lines already differ, you cannot use the test to draw conclusions about the oven; first make the stamping consistent.
- Change just one condition. If you suspect warm dough, moderately chill one piece as the recipe permits and leave the other as usual. Do not change the flour, sugar and raising agent at the same time.
- Bake under comparable conditions. Use the same tray, temperature and similar oven positions. Placing the cookies on different shelves would accidentally introduce another variable: heat distribution.
- Judge them when cool. Compare the outer shape, the height of the embossed ridges and the clarity of the finest lines. Also note whether the centres are fully baked and what texture they have.
- Choose the next adjustment only afterwards. If chilling helps, test whether the result repeats with a small new batch. If both designs blur equally, examine the recipe and the type of raising agent instead.
If the impression is poor as soon as the dough leaves the mould, investigate the mould and your shaping technique rather than oven settings. If the outline expands during baking, begin with spreading. If the cookie mostly grows upwards, look at raising agents and thickness. Testing one explanation at a time is far more useful than sacrificing an entire batch to guesswork.
Springerle: an important exception, not a universal method
Some traditional Springerle recipes preserve their embossed designs by drying the surface before baking. That technique belongs to a particular dough and way of rising. Do not automatically apply an extended drying stage to ordinary soft gingerbread. A change like that can affect texture, safety and the final outcome.
If you're making Springerle, follow the complete method specified for that dough. For gingerbread made with honey, fat and different raising agents, use a tested method suited to those ingredients. The fact that both recipes use carved wooden moulds does not make their preparation or baking conditions interchangeable.
Three checks before you bake a full batch
- Inspect the unbaked pattern. Fine lines should be clear when the cookie comes away from the mould. If not, adjust the dough, clean the mould or correct the pressing technique before you fill a tray.
- Bake two comparable pieces. Keep dough, design and thickness the same, change only one condition and assess both definition and doneness after the cookies have cooled.
- Decide what matters most. For very soft gingerbread, allow for a gentler impression. For intricate decoration, choose dough intended for stamped cookies rather than adding random amounts of flour.
The takeaway: check stamping first, then spreading
The most useful clue isn't a number on the clock. It's the moment the pattern lost its definition. If it was never sharp on the unbaked cookie, adjust the stamping process. If it fades only in the oven, investigate spreading, rising and whether the dough suits embossed baking. Two controlled test pieces tell you more than several simultaneous changes to one bowl of dough.
For problems preparing the surface, see our guide to rolling dough without sticking. If the cookies spread excessively, read about cookie dough consistency and spreading. If the imprint survives but the biscuit becomes too hard, that's a different issue: why cookies become hard. What you're aiming for is a clear design and a properly baked, enjoyable cookie.
Diagnostics
Common problems and solutions
The pattern is already blurred when the cookie leaves the wooden mould
Cause: Overly soft or sticky dough, uneven pressure or moisture in the grooves
Solution: Clean and dry the mould, dust lightly if needed and try another evenly pressed test cookie.
The unbaked design is sharp but becomes wide and shallow
Cause: Dough spreading because of the formula or softened fat
Solution: Compare matching pieces after suitable chilling and consider a low-spread stamped-cookie recipe.
The design puffs up unevenly in the oven
Cause: Type or amount of raising agent and uneven dough thickness
Solution: Check the measured quantities and thickness; do not add or remove raising agents without checking the recipe.
Dough sticks in the smallest carved recesses
Cause: Moisture, residue or dough that lacks the right consistency
Solution: Gently clean the mould, use only a thin dusting of flour and reassess the dough before stamping again.
The pattern survives but the biscuit is dry and hard
Cause: Overbaking or changes to flour and moisture balance
Solution: Do not chase a sharp pattern by baking longer or adding random flour; address the texture separately.
Frequently asked questions
Answers to common questions
Can I use an ordinary soft gingerbread recipe with a wooden cookie mould?
You can try, but rising and spreading often soften fine details. For a more reliable embossed pattern, use dough designed specifically for stamping.
Must I freeze stamped gingerbread before baking?
No. Chilling can help some buttery doughs hold their shape, but it is not a universal rule. Follow the recipe and compare a few test cookies.
Do all stamped cookies need to dry before baking?
No. Drying the surface is part of certain methods, notably Springerle. Do not apply it to ordinary soft gingerbread without an appropriate tested recipe.
Why does a perfect unbaked design disappear in the oven?
The dough may spread or rise unevenly as it heats. Check the formula, fat consistency, raising agent and baking conditions rather than blaming the mould alone.