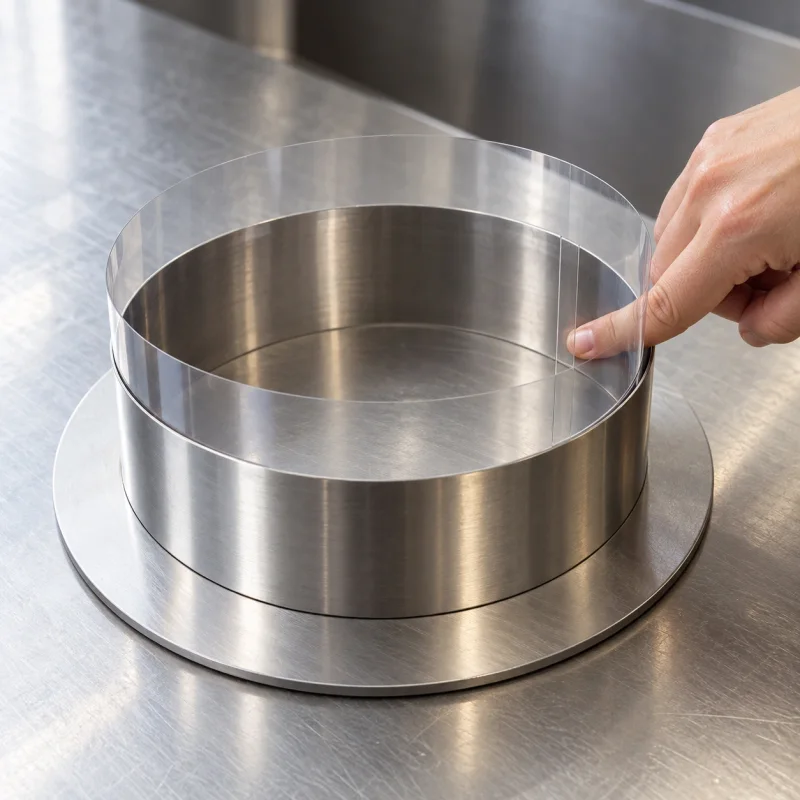
Smooth sides start before the first layer of mousse
A crease left in the collar can show up on the cake. Fit the strip against the inside wall, level its bottom edge with the base and overlap the ends flat. It must reach the finished dessert’s height; the mousse must hold its shape after chilling.
For material choice and permitted uses, see the guide to acetate cake collars. Here is how to fit it inside a round ring.
1. Prepare the ring, base and food-contact strip
Place the ring on a level, stable base suitable for the recipe’s assembly method. Secure an adjustable ring at the chosen diameter before measuring. The collar lines the wall; it does not seal the bottom.
Use material intended for direct food contact and the planned conditions. Ordinary cold-assembly film is not a substitute for baking parchment. Check the product instructions for refrigeration, freezing and any heat use; put it in an oven only if explicitly permitted.
2. Calculate the length, then check the overlap
Use the internal diameter of a round ring:
Strip length ≈ π × internal diameter + overlap length.
At 20cm, the circumference is 20 × π ≈ 62.8cm, before overlap. Add a small allowance, insert the strip and check that the ends overlap flat without a gap. Cutting exactly 62.8cm leaves no overlap allowance.
The calculation is a starting point: check the actual fit in the set ring. Overlap depends on the film and assembly; one fixed centimetre allowance cannot suit every strip. Avoid multiple wraps, which make the seam more pronounced.
3. Align the bottom edge and the ends
Open the collar out against the metal wall. Its lower edge should sit in one plane all around; align the ends in height. Keep the overlap flat and closed without a curled end projecting into the mousse space.
Look from above for sharp creases or a section bowing inward, then inspect from the side. If the bottom edge lifts in one spot, refit it before filling.
Very stiff film may resist a small ring’s curve; a tall, soft section without support may wave. Choose stiffness for the diameter and height instead of forcing unsuitable material into a crease. A fine seam line may remain even with correct fitting.
4. Check the height above the ring
The collar must reach at least the finished chilled dessert’s height. If mousse rises above the metal ring, the strip must also extend above it and remain straight. A tall unsupported section needs particular care; extra height alone is no guarantee of support.
Before pouring, check level base, aligned bottom edge, flat closed overlap, suitable height and collar against the wall.
5. Fill next to the collar without shifting it
Add mousse steadily according to the recipe. With thicker mousse, gently spread it to the collar with a spatula so there are no voids. With liquid mousse, watch for an opening seam or a strip pulling away. Stop and correct a crease while the filling is still manageable.
Lightly tap the mould only if the recipe and inserts allow it; vigorous shaking is not a general bubble remedy. Keep the filled assembly level and stable during chilling. A substantial tilt can change the liquid level or move an insert.
6. Remove support when the dessert holds its shape
Follow the recipe’s refrigeration or freezing process. At the required stage, lift away the metal ring, then peel the collar slowly along the surface without jerking outward.
A frozen entremet often releases cleanly; chilled, unfrozen mousse must support its own side. If mousse sticks and tears, stop forcing it and check whether it is set enough or its surface has started softening. If the side bulges after release, review stabilization and chilling. The collar shapes the surface; it cannot correct the mousse formula.
Diagnostics
Common problems and solutions
A thin vertical line on the cake side
Cause: The overlap creates a raised edge.
Solution: Align the ends in height and reduce the overlap while keeping it flat and closed. A fine line may remain.
Wavy sides
Cause: A crease, a gap from the ring or unsuitable stiffness.
Solution: Refit the strip or choose a more suitable stiffness.
Mousse bulges after removing the collar
Cause: The filling is not sufficiently stable on its own.
Solution: Complete the recipe’s chilling if needed; if the mousse still cannot hold its shape, check the formula and stabilization. Thicker film alone will not fix it.
Frequently asked questions
Answers to common questions
Why are the sides uneven when the mousse looked smooth during pouring?
Mousse takes the shape of the surface it touches. Creases, gaps from the ring, a raised overlap or air pockets can leave marks. Align the collar first, then fill the space next to it without voids.
Should the collar be stretched tight?
It is not an elastic band. It should follow the inner wall calmly without folds or gaps. Very stiff film can resist a small radius; a tall, soft unsupported section may wave.
What happens if an air pocket remains next to the collar?
It can leave an indentation or small hole. Gently spread the filling to the edge; lightly tap the mould only if the recipe and inserts allow it. Remove voids without pressing on the collar.
How can I spot poor contact while filling?
Look for visible voids, creases and a displaced seam. Bring mousse gently to the collar with a spatula or controlled pouring without shifting the strip.
Does moving the ring during chilling damage the sides?
A large movement or tilt can change the level of liquid or partly set mousse and displace inserts. Keep the filled assembly level and stable. A minimal touch does not automatically deform it; the filling’s state matters.
How does the overlap affect the finish?
It can leave a thin vertical line or small step. Align both ends in height and overlap them flat without a gap. A less prominent edge makes a less prominent impression, but an invisible seam is not guaranteed.