Chocolate ganache: choose the ratio by use, not by one universal formula
Chocolate ganache is an emulsion of chocolate and cream. Two decisions control the result: the chocolate-to-cream ratio sets the starting firmness, while the way you emulsify determines whether the mixture becomes smooth, glossy and free of separated oil. A single 1:1 formula therefore cannot be correct for every chocolate and every purpose.
A practical starting point per 100 g heavy cream is:
| Use | Dark chocolate | Milk chocolate | White chocolate |
|---|---|---|---|
| Softer filling or light coating | about 100 g | about 150 g | about 200 g |
| Firmer coating or piping | about 150–200 g | about 200–250 g | about 250–300 g |
These are starting points, not universal formulas. Two dark chocolates with the same cacao percentage can behave differently because their cocoa butter, cocoa solids and sugar differ. Use the table for the first batch, then record the exact chocolate and the working temperature if you want repeatable results.
For a glaze, use the ganache while it still falls in a continuous ribbon. For coating or piping, let it stabilize until it holds shape but still spreads without tearing. Do not immediately add more chocolate just because a freshly mixed ganache looks soft: cocoa butter crystallizes as it cools and the mixture firms up.
A smooth ganache begins with a small glossy core
Oily streaks mean the emulsion is not stable yet
Finely chop the chocolate into pieces of roughly similar size. Pour the hot cream over it and wait 60–90 seconds. Then begin stirring with a spatula in a small circle in the center.
The first correct signal is a small, thick, elastic and glossy core. Keep that center intact and gradually widen the circle until the whole mixture is uniform. If you stir aggressively from edge to edge before that core forms, the mixture can look grainy or oily even though all ingredients are present.
The bowl should be dry and not very cold. A cold wall can thicken part of the ganache before the rest has emulsified.
Heat the cream enough to melt the chocolate, not to change the formula
For finely chopped dark and milk chocolate, 80–85 °C is a useful starting range for the cream. For white chocolate, 75–80 °C is often sufficient. The target is not one magic number: the chocolate must soften completely without prolonged boiling of the cream.
After the resting time, pieces should yield under the spatula without a hard center. If the cream boils hard for too long, water evaporates and the effective ratio changes.
For a larger batch, a firm formula or white chocolate, you can add the cream in two or three additions. Emulsify each addition until the center is glossy and elastic before adding more liquid.
Why the same ratio does not behave the same with every chocolate
Cacao percentage alone does not tell you how much cocoa butter, cocoa solids, sugar and milk solids are present. Those components change how much liquid the chocolate can accept and how firm the ganache becomes after cooling.
That is why the best working habit is to record the chocolate, ratio, room temperature and final consistency. A repeatable formula is more useful than a supposed universal ratio.
Use an immersion blender without pulling in air
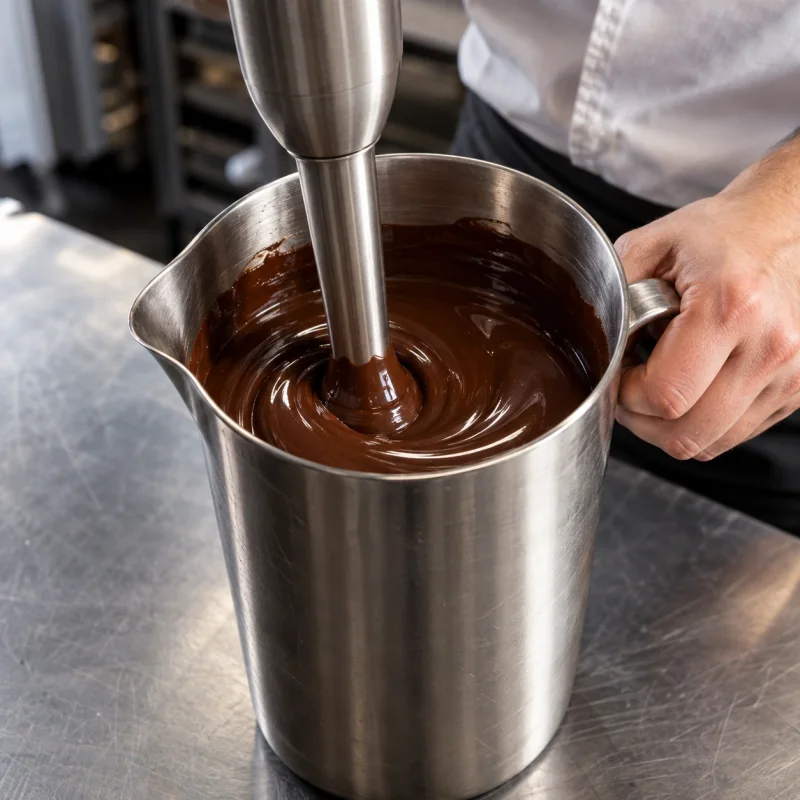
Use the immersion blender only after all hard chocolate particles have melted and the mixture is fluid enough to move around the blade. A useful working area is often about 35–40 °C for dark ganache and 32–35 °C for milk or white ganache.
Use a narrow, tall jug. Fully submerge the blender head and tilt the jug slightly if needed. Do not lift the running blade through the surface. If a vortex starts pulling air downward, change the angle or speed instead of pumping the blender up and down.
Trapped air may not be obvious when the ganache is fresh. After cooling it often appears as pinholes, pits or a broken sheen.
Fix the fault you actually have
Oily film, hard pieces and bubbles are not the same problem
If oil floats on the surface, first bring the whole batch to an even temperature where it is fluid enough to blend. Then homogenize with the blender submerged.
If the emulsion still does not come back, begin with a very small correction: about 5 g warm cream per 300 g ganache. Blend briefly and reassess. Repeat only if oily streaks remain. Stop as soon as the ganache is uniformly glossy, because every extra gram of cream makes the final texture softer.
If there is no free oil but hard chocolate pieces remain, the problem is probably incomplete melting rather than a broken emulsion. Warm gently until the pieces soften, homogenize and strain if necessary.
If the ganache is simply too firm at working temperature, warm it first. If it is still too firm, add warm cream in small increments. If it is too soft after complete stabilization, first make sure the center and edge are equally cool; only then consider adding more melted chocolate of the same type.
Cooling reveals the real consistency
Fresh ganache is softer than stabilized ganache. During cooling, the fat structure changes and cocoa butter crystallizes, so do not judge final firmness immediately after mixing.
Place film directly on the surface. If you cool a larger batch quickly in the refrigerator, stir it gently about every 10–15 minutes until the edge and center have similar consistency.
Ganache for glazing is ready when it falls from the spatula in a continuous ribbon and the trail levels within a few seconds. Ganache for coating should stay on the side of a cake without sliding but spread without tearing. Ganache for piping should keep a clean shape without cracked edges.
Whipped ganache is a separate preparation. It starts from a stable, chilled emulsion and a formula designed for whipping. Do not whip warm basic ganache simply because you want it thicker.
For the most reliable result, judge ganache at the temperature at which you will actually use it: by flow for glazing, by spreadability for coating and by shape retention for filling or piping.
Diagnostics
Common problems and solutions
Problem
Cause: The emulsion is unstable, or the water and fat phases separated because temperature or mixing was unsuitable.
Problem
Cause: The chocolate has not fully melted; this is not necessarily an emulsion failure.
Problem
Cause: The immersion blender or spatula pulled air into the ganache.
Problem
Cause: The liquid proportion is too high for that chocolate and use, or the batch is still cooling unevenly.
Problem
Cause: It is too cold or the chocolate proportion is too high for the intended use.
Frequently asked questions
Answers to common questions
What chocolate-to-cream ratio should I use for ganache?
For a softer texture, a useful starting point per 100 g cream is about 100 g dark, 150 g milk or 200 g white chocolate. Increase the chocolate for firmer coating or piping, and always adjust to the specific chocolate and working temperature.
Does the cream need to boil for ganache?
No. The goal is to transfer enough heat to soften and melt the chocolate without prolonged boiling. About 80–85 °C for dark and milk and 75–80 °C for white chocolate are practical starting ranges.
Why is my ganache not glossy?
Common causes are an incomplete emulsion, trapped air or uneven temperature. First check that all chocolate is melted and whether free oil is appearing on the surface.
How do I fix split chocolate ganache?
Bring the ganache back to a fluid state suitable for homogenizing, then blend with the head fully submerged. If necessary, add warm cream in tiny increments—about 5 g per 300 g ganache—until the sheen and smooth texture return.
Is whipped ganache the same as basic ganache?
No. Whipped ganache starts from a stable chilled emulsion and a formula designed for whipping. Do not whip warm basic ganache simply to make it thicker.