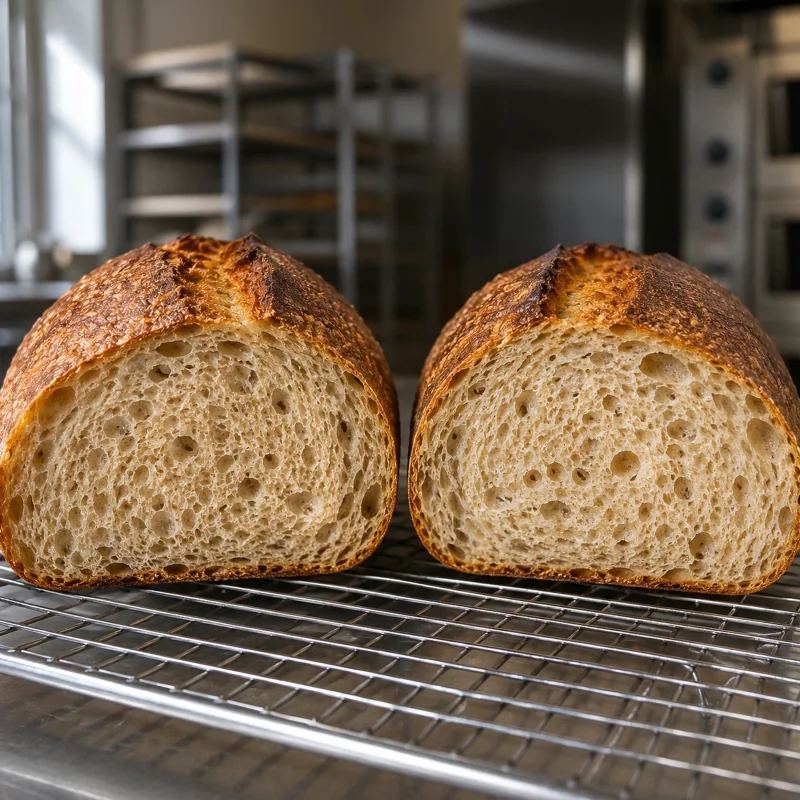
Good bread comes from a temperature profile, not one number
A loaf can already look deeply browned while a damp, compressed crumb is still hiding beneath the crust. The opposite also happens: the centre is baked through, yet the crust stays pale, soft and without a clean crack. In both cases the problem is not simply the number of minutes. What matters is the whole baking profile: how thoroughly the oven is preheated, the starting temperature, how steam is used, when moisture is vented and how the final drying phase is managed.
During baking, heat reaches the dough through radiation from the hot oven walls, moving air and direct contact with a hot tray, stone, steel or pan. Inside the loaf, heat moves more slowly while water migrates, evaporates and can condense again in cooler parts of the crumb. The number on the oven display therefore does not tell you how quickly the centre of the loaf is actually heating.
Proper temperature control while baking bread means giving the loaf enough energy for oven spring first, then enough time for the crumb to set and the crust to dry without burning too early.
Oven temperature is not bread temperature.
If you need a starting point based on dough type, loaf shape and oven mode, use the guide to choosing bread-baking temperature.
Practical starting profile for a classic free-form lean wheat loaf: preheat thoroughly, start around 240–250 °C (464–482 °F), use a short moist phase for the first 10–15 minutes, then release the steam and continue around 210–225 °C (410–437 °F). Do not judge the end of the bake by colour alone. About 96–98 °C (205–208 °F) in the centre is a useful check for a lean wheat loaf, not a universal endpoint for every bread.
Preheat the oven fully. An empty cavity may reach the set temperature quickly, while a stone, steel plate, cast-iron pot or heavy tray needs considerably longer to store enough heat. Use a separate oven thermometer to verify the air temperature when necessary, and allow heavy baking surfaces to preheat until their temperature has stabilised. If the oven behaves differently from the setting, verify it with the home oven calibration guide.
Starting heat drives oven spring; finishing heat controls crust and water loss
In the first minutes, gases in the dough expand, yeast remains active briefly and the still-soft structure can increase in volume. For a free-form lean wheat loaf, 235–250 °C (455–482 °F) is a common starting range. It is not a universal setting, but a practical reference for properly proofed dough without large amounts of sugar, milk or fat.
Once the main oven spring has finished and the score has opened, reduce the temperature. A finishing range of roughly 210–225 °C (410–437 °F) gives heat more time to reach the centre without taking the crust too dark before the crumb is stable.
Useful starting profiles for home baking are:
| Bread type | Starting temperature | Finishing temperature | Typical total time |
|---|---|---|---|
| Free-form wheat loaf, 600–900 g | 240–250 °C | 215–225 °C | 30–45 min |
| Pan loaf, 800–1,000 g | 220–230 °C | 195–210 °C | 40–55 min |
| Whole-grain or mixed-flour loaf, 700–1,000 g | 225–240 °C | 205–220 °C | 40–60 min |
| Enriched bread with milk, butter or sugar | 185–205 °C | same or up to 10 °C lower | 25–45 min |
| Rolls, 70–120 g | 220–240 °C | 210–225 °C | 12–22 min |
These ranges assume a preheated oven and do not replace the recipe. Baking time changes with loaf shape, hydration, the proportion of whole-grain or rye flour, dough temperature and the way heat is transferred.
A broad, low loaf bakes faster than a tall round loaf of the same weight because heat has a shorter distance to travel to the centre and water can escape through a larger surface area.
With convection, a starting point about 10–20 °C lower than conventional top-and-bottom heat is often sensible, but it is not a fixed conversion. Fan strength varies greatly between ovens. For the choice of mode, rack position and airflow, see the guide to using convection and conventional heat correctly when baking.
Steam keeps the surface extensible only at the start
In a dry oven, the dough surface begins losing water immediately. A firm skin forms and resists further expansion. If that happens too soon, the score opens poorly, the loaf can spread at the base or split at a weak point.
Steam condenses on the cooler dough surface and temporarily slows drying. The surface remains flexible, the score can open and the loaf can gain its last burst of volume. Moist heat also affects surface starch, shine and the mechanical properties of the developing crust.
For most free-form loaves, use steam during the first 10–15 minutes. With a larger loaf, the moist phase can sometimes continue to about 18 minutes if the surface is still expanding and has not yet fully coloured.
In a standard home oven, use a sturdy metal pan intended for heating and add only enough boiling water at loading to create steam promptly. The exact amount depends on oven volume, door sealing and the number of loaves. The aim is a short humid phase, not prolonged boiling beneath the bread.
Keep your face, hands and upper body out of the path of the steam when adding water.
Do not pour water onto oven glass, the oven floor, heating elements or a cold glass dish.
When baking in a closed cast-iron or steel vessel, additional water is usually unnecessary. The lid traps steam released by the dough itself. Remove the lid after roughly 15–25 minutes, depending on loaf size and the recipe, then finish the crust in a drier environment.
The mechanism of surface condensation, score opening and crust formation is explained in more detail in the guide to steam in bread baking.
Oven humidity and crumb moisture are not the same thing
Steam in the oven mainly controls the surface. Moisture in the crumb depends on the water in the dough, how flour binds that water, loaf size, baking duration and how strongly the final drying phase is run.
After oven spring, the humid phase should end. If your method traps steam, briefly vent the oven, remove the steam source or take off the lid, then continue in a drier environment. In an oven that actively vents moisture, opening the door may not be necessary. Convection is most useful only after the loaf volume has stabilised.
Too much humidity late in the bake can leave a thin, soft or leathery crust. Browning is delayed because a wet surface stays near the temperature at which water evaporates. Stronger browning starts only after the surface has dried enough for its temperature to rise.
Drying too quickly creates the opposite problem. The crust sets before oven spring is complete, then becomes thick and dark while the crumb still needs heat.
Managing moisture during bread baking therefore works best as two clearly separated phases: first a humid environment for surface expansion, then a dry environment for colour, aroma and crisp crust development.
Baking time should follow loaf thickness, not weight alone
Two 500 g loaves do not bake the same way as one 1,000 g loaf. The total amount of dough is equal, but a larger loaf has a longer path from the hot surface to the cool centre.
Judge time together with shape:
- small rolls bake quickly because their centres are close to the surface;
- a long, narrow loaf heats faster than a tall round loaf of the same weight;
- a metal pan transfers heat through its walls as well as from the oven air;
- glass and ceramic pans heat and respond differently from thin metal;
- very wet dough needs more time to stabilise and usually a longer cooling period.
Opening the oven repeatedly extends the bake and disrupts the temperature profile. Avoid opening the door during the first 15–20 minutes, except when you deliberately remove steam or a lid. After that, reposition the loaf only when browning is clearly uneven.
For a large loaf, do not solve a pale crust by keeping the oven extremely hot from the beginning. Use a stronger starting phase and a more moderate, longer finishing phase.
Internal temperature confirms doneness, but it does not explain every defect
As the loaf heats, proteins set, starch absorbs available water and gelatinises, and the walls of the gas cells change from a soft foam into a stable crumb. These changes do not happen at one exact temperature; they occur progressively and depend on water content, dough composition and heating rate.
For an ordinary lean wheat loaf, 96–98 °C (205–208 °F) in the centre is a useful confirmation that the middle has received enough heat. Measure in the thickest part and place the probe in the centre rather than just under the crust.
Use the thermometer correctly: probe placement matters, and an instant-read probe, an oven thermometer and an infrared thermometer do not measure the same thing. A high internal temperature also cannot repair dough that was over-proofed, poorly developed or incorrectly hydrated.
The loaf can reach a high core temperature and still be dense, gummy or collapsed. If it loses volume after baking, check proofing, dough strength and whether the centre was stable. If you suspect an underbaked centre, distinguish insufficient heat from structural problems rather than simply extending every bake.
Alongside temperature, check whether the sides and score feel firm, the bottom edge is evenly browned and the loaf feels noticeably lighter. A hollow sound when tapping the base is only supporting evidence: a thick crust can sound hollow even when the crumb is not fully stable.
Control crust colour only after the crumb is stable
Crust colour depends on surface temperature, time, sugar and protein content, and how dry the surface becomes. Two loaves at the same oven setting therefore do not brown identically. Dough containing milk, eggs, honey or more sugar darkens faster than lean bread made from flour, water, salt and yeast.
If the crust darkens before the crumb is ready, lower the heat and finish the bake more gently. If the crumb is already stable but the crust remains pale, increase moisture removal toward the end. More specific corrections for pale, overly thick or bitter crust are covered in the guide to controlling bread crust colour without drying the crumb.
Colour must not make the decision instead of the centre.
Cooling is the final phase of baking
Bread is not fully stable the moment it leaves the oven. Heat and water vapour remain in the crumb, while moisture redistributes toward cooler parts during cooling.
Move the loaf to a rack immediately so air can reach the base. Cool a typical wheat loaf for at least 60–90 minutes and a larger whole-grain loaf for about 2 hours. High-rye bread needs even longer because its moist crumb sets more slowly.
Cutting too early releases steam, compresses still-soft cell walls and can leave a sticky smear on the knife. That does not always mean the loaf was underbaked; it may simply have been sliced before the crumb finished setting.
For the next bake, record the starting temperature, the minute when steam was released, the finishing temperature and the total baking time. Those four observations quickly show which part of the profile needs adjustment.
Diagnostics
Common problems and solutions
The crust is dark but the crumb is wet or sticky.
Cause: The starting or overall heat is too high for the loaf size, so the surface browns faster than heat reaches the centre.
Solution: After oven spring, reduce the temperature by about 15–25 °C and extend the finishing phase. Check doneness in the thickest part, not by colour alone.
The loaf opens poorly and splits near the bottom edge.
Cause: The surface set too early because the oven was too dry or convection dried it rapidly.
Solution: Use steam for the first 10–15 minutes and keep convection off or reduced. Also check scoring depth and proofing.
The crust becomes soft and leathery after cooling.
Cause: Steam remained in the oven too long or air could not circulate around the base after baking.
Solution: Vent steam completely after oven spring, increase drying during the last 5–10 minutes and move the loaf straight to a rack.
The bottom of the bread is pale and soft.
Cause: The baking surface was not fully heated, or a thick pan transferred heat too slowly.
Solution: Preheat stone, steel or a heavy vessel until thermally stable. For pan bread, finish the last 5–10 minutes out of the pan if appropriate.
The bread reaches a high internal temperature but the crumb is dense or gummy.
Cause: The problem began in the dough: over-proofing, weak gluten structure, excessive hydration or slicing too soon can all produce this result.
Solution: Review dough development and final proof, cool the loaf completely and do not use internal temperature as the only test.
Technical terms
Terms worth understanding
- Temperature profile
- The sequence of starting, intermediate and finishing temperatures used to control oven spring, crumb setting and crust browning.
- Heat transfer
- Movement of energy from hot air, oven walls, baking surface or pan toward the dough surface and centre.
- Starch gelatinisation
- The process in which starch heated in the presence of water swells and helps turn soft dough into a stable bread crumb.
- Oven spring
- The rapid increase in loaf volume during the first minutes of baking before the crust and internal structure fully set.
- Final drying phase
- The steam-free part of baking in which the surface loses water, browns and develops a crisp crust.
Frequently asked questions
Answers to common questions
Which oven rack position is best for bread?
A free-form loaf usually works well on a lower-middle rack, where it has room to expand and receives strong heat from below without the top colouring too quickly.
Can bread be baked starting in a cold oven?
Only when the recipe is designed for that method. A conventional risen loaf placed in a cold oven sets more slowly, has less predictable oven spring and usually needs a longer drying phase.
Is a baking stone essential for a good crust?
No. A well-preheated metal tray, baking steel or covered heavy pot can provide enough initial heat. The main difference is how quickly and how much energy reaches the bottom of the loaf.
Should convection be on while bread is baking?
Usually keep it off during the early humid phase because moving air speeds surface drying. It can be useful near the end for more even colour and a drier crust.
Why does bread crack while it cools?
The crust contracts while moisture moves between crust and crumb, creating stress. Fine crackling on a crisp loaf is normal; deep splits can point to a crust that set too early or to proofing issues.